Wednesday, 29 December 2021

BEG CHAP 1 MCQ

BEG CHAP 1 MCQ 


line drawn with a long section, short dash, and another long section is a __________.


(A) Hidden feature


(B) Center of a circle


(C) Center axis of a hidden cylinder


(D) Center of a radius


Correct Answer


Answer: Option C


How many battens will be there for a Drawing board?

a) 1

b) 2

c) 3

d) 4

View Answer


Answer: b


Small bow compass can draw circles less than 


_____ mm radius.

a) 25mm

b) 30mm

c) 35mm

d) 40mm

View Answer


Answer: a


Which is not the use of divider?

a) To divide curved or straight lines into the desired number of equal parts

b) To draw circles

c) To transfer dimensions from one part of the drawing to another part

d) To set-off given distances from the scale to the drawing

View Answer


Answer: b


. _________ is used to draw curves which are not circular.

a) Compass

b) Protractor


c) French curves

d) Pro circle

View Answer


Answer: c


The areas of the two subsequent sizes of drawing sheet are in the ratio ____

a) 1:5

b) 1:4

c) 1:2

d) 1:10

View Answer


Answer: c


The sizes from A0 to A5 increases.

a) True

b) False

View Answer


Answer: b


The increase in hardness is shown by the value of the figure put in front of the letter H, 2H, 3H, and 4H 


etc.

a) True

b) False

View Answer


Answer: a


What is the next size of 210 mm x 297 mm in drawing papers?

a) 148 mm x 210 mm

b) 297 mm x 420 mm

c) 420 mm x 594 mm

d) 105 mm x 148 mm

View Answer


Answer: b


The Grade becomes ______ according to the figure placed in front of the letter B, 2B, 3B, 4B etc.

a) harder

b) lighter

c) darker

d) softer

View Answer


Answer: d


The accuracy of the drawing depends on the quality of the instruments used.

a) True

b) False

View Answer


Answer: a


Which of the following instrument is made of thin strips of wood arranged in a line to form a rectangle and on which, the drawing is made?

a) Mini – drafter

b) Drawing Board

c) Protractor

d) Scale

View Answer


Answer: b


Which of the following tools is used to draw horizontal lines?

a) Mini – drafter

b) Protractor


c) T – square

d) French curve

View Answer


Answer: c


Which of the following instrument can be used to draw accurate perpendicular lines, parallel lines and angular lines?

a) Mini – drafter

b) T – square

c) Protractor

d) Set square

View Answer


Answer: a


According to the Indian Standard Institute (ISI), which among the following designation has the size 1000 x 700 (in mm)?

a) B0

b) B1

c) B2

d) B3

View Answer


Answer: b


Which is the most common tool used for drawing circles?

a) French curve

b) Mini – drafter

c) Divider

d) Compass

View Answer


Answer: d


For drawing circles with a large radius, which of the following tool is used?

a) Bow compass

b) Lengthening bar compass

c) Divider

d) Protractors

View Answer


Answer: b


Which of the following drawing tool is not used to set the drawing sheet onto the drawing board?


a) Drawing clips

b) Drawing pins

c) Divider

d) Adhesive Tape

View Answer


Answer: c


According to the Indian Standard Institution (ISI), what is the size of the designation A3 in mm?

a) 420 x 297

b) 841 x 594

c) 1189 x 841

d) 297 x 210

View Answer


Answer: a


Which of the following drawing tool is used to transfer dimensions when there is a repetition of the dimensions?

a) Compass

b) Protractor

c) Divider

d) Mini – Drafter


View Answer


Answer: c


Which of the following grades of leads is the hardest?

a) 6B

b) 5H

c) 4B

d) 6H

View Answer


Answer: d


For marking angles, which of the following drawing tool is used?

a) Protractor

b) Divider

c) Compass

d) French curve

View Answer


Answer: a


Using 30˚ – 60˚ – 90˚ and 45˚ – 45˚ – 90˚ set 


squares, which of the following angle is not possible to draw?

a) 45˚

b) 30˚

c) 10˚

d) 90˚

View Answer


Answer: c


The preferred size of the drawing sheets is recommended by the ______

a) B.I.S.

b) ASME

c) ASTM

d) NIST

View Answer


Answer: a


SP: 46 (2003) recommends the borders of _______ mm width for the sheet sizes A0 and A1, and _______ mm for the sizes A2, A3, A4 and A5.

a) 10, 20

b) 15, 20


c) 20, 10

d) 15, 10

View Answer


Answer: c


The size of the title block is ________ mm x ________ mm.

a) 25 x 10

b) 100 x 25

c) 65 x 185

d) 185 x 65

View Answer


Answer: d


Which of the following is reducing scale?

a) 10:1

b) 10:2

c) 0.5:1

d) 2:1

View Answer


Answer: c


1:10000 is enlarging scale.

a) True

b) False

View Answer


Answer: b


__________ is not an essential thing for free-hand sketching.

a) A soft-grade pencil

b) French curves

c) A soft rubber-eraser

d) A paper in form of a sketch-book or a pad

View Answer


Answer: b

Monday, 27 December 2021

BEG WEEK 3 SESSION2 SCALES


Thursday, 23 December 2021

Technical lettering

 Technical Lettering

Syllabus: 

1. Introduction to lettering and its necessity. Demonstrate the construction details of English alphabets and numerals in 7:4 ratio and free hand in parallel lines

2. Sheet no.3 practice of single stroke vertical English alphabets and numerals (0-9) – uppercase letters (Height14mm and 20mm lettering in 7:4 ratio) in single stroke

Sheet no.4 practice of single stroke inclined English alphabets and numerals (0-9) – uppercase letters (Height14mm and 20mm lettering in 7:4 ratio)


INTRODUCTION


https://youtu.be/bsutdDrPrKw


Technical Lettering is a barren piece of engineering drawing. It gives data concerning measures, and guidelines, as notes and measurements. On a drawing, the entire of the composed data is consistently through lettering. It isn't manually written. Likewise, it very well might be added here, that Lettering is fitting and right words however not (Printing implies the creation of literature on a print machine)

·                     Lettering

The writing of alphabets and numerals such as A, B, C, D…………………….Z and 1, 2, 3……………9, 0 respectively is called Lettering.

Mainly, there are two types of lettering most commonly used in engineering drawing viz. Gothic Lettering and Roman Lettering.

Single Stroke Letters

Single stroke letters are simplest form of letters and are used to write titles, dimensions, notes and other information on a drawing. Lettering using single stroke letters has been recommended by Bureau of Indian Standards (BIS) and described in IS:9609-1990. The word “single stroke” indicates that the thickness of lines used in letters should be such as obtained in single stroke of pencil. It does not mean that letter written in single stroke without lifting the pencil. The single stroke letters may be of two types e.g., vertical and inclined letters.
The vertical letters are used for general purpose lettering in engineering drawing. Height to width ratio of such letters varies. But for all practical purposes the letters with height to width ratio may be taken as 7:5 or 6:5 for all capital letters except I, J, L, M and W. For M and W the suitable ratio is 10:8 and for I, this ratio is taken as 10:2. For numerals such ratio may be taken as 7:4 or 6:3. Single stroke vertical upper and lower case letters and numerals are shown in Fig. 1.17. The inclined/italics letters are written


at an angle of 75o from horizontal towards right. Fig illustrates typical inclined
letters and numerals. The size of letters and numerals is specified by their heights ‘h’. The
standard heights of letters and numerals for practical use are 1.8, 2.5, 3.5, 5.7, 10, 14 and
20 mm as recommended by BIS. The letters size 5 mm-10 mm may be used for main title
of drawing. For sub-titles, letter size of 3.5 mm or 5 mm may be used conveniently. The
letters and numerals having size 2.5, 3.5 or 5 mm are suitable for writing notes,
dimensions etc. The single stroke letters may be of A type or B type. In A type letter,
height of letter is divided into fourteen parts whereas in B type letter, the height is divided
into 10 parts. The recommended ratio, spacing between letters and thickness of lines
(stems) of letters are summarized in Table  and are explained in Fig


Gothic Letters  
When the stem of letters are given more thickness, such letters are called as gothic letters.These letters are used for writing the main title for ink drawing. Thickness of stem maybe taken as 1/5th to 1/10th of the height of letters.
General Rules for Lettering
(a) Select the size of letters suitable to given drawing.
(b) Draw horizontal guide lines keeping the distance between them equal to the
height of letters.
(c) Width of letters may be taken equal to the height of the letter. Complete the
lettering with the standard dimensions.
(d) Do not erase the guide lines.

·                     Height Of Lettering

The height "h" of the capital letter is taken as the base of dimensioning.
The main requirement of lettering on engineering drawing are legibility, uniformity, ease and rapidity in execution.
Both upright and inclined letter are suitable for general use. All letters should be capital, except where lower case letters are accepted internationally for abbreviations.
The recommended size of lettering is as under :-

ITEM

SIZE h, mm

Drawing number in Title Block and letters denoting Cutting Plane Section

10, 12

Title of Drawing

6, 8

Sub-titles and Headings

3, 4, 5, 6,

Notes, such as Legends, Schedules, Material list, Dimensioning

3, 4, 5

Alteration, Enteries and Tolerances

2, 3


·                     Guide Lines

The light thin lines drawn to obtain uniform and correct height of letters are called Guide Lines.
Guide line should be drawn very light and thin, so that, they need not be erased after the lettering is finished. To erase guide lines after finishing the lettering is not easily possible. Guide line for capital and lower case lettering


·                      How To Draw Graph For Lettering

The letters are drawn in a graph. Before drawing the alphabets or numerals of 7:4, 5:4 or any other ratio, a graph is needed.


·                     First of all take the height of  the lettering and draw two parallel horizontal lines.


·                     Draw an inclined line at A and mark, 7 or 5 or as required number of vertical squares or rhombii, parts of any suitable size. Join B1 with B.


·                     Draw parallel line to B1B from 1, 2, 3, 4, 5, 6 meeting the line AB at A1, A2, A3, A4, A5 and A6.


·                     From A1, A2, A3, A4, A5 and A6 draw horizontal line.


·                     From point B draw line at 45' to the horizontal.


Draw the vertical line for making lines for making squares and inclined line at an angle of 75' for making graph for inclined letters.

Problems For Practice SHEET NO: 3

1.             Rewrite the following in vertical up right printing. Take height of letters = 10 mm. "GROW MORE FOOD"

2.            Rewrite in inclined lettering technique 10 mm height in capital  letters the following :- DIFFERENT MATERIALS SHOULD BE INDICATED BY NOTES ON DRAWING

3.             Write your name and the name of your institution in  single stroke vertical lettering, taking height of letters as 3 mm, 5 mm, 8 mm, 10 mm and 12 mm.

4.             Rewrite the following in free hand vertical upright and inclined lettering. I AM PROUD OF MY COUNTRY, take height of letters = 3 mm,4 mm,6 mm, 8 mm and 12 mm.

5.             Draw single stroke vertical capital letters of ratio 7 : 4 and 6 : 5, INDIAN STANDARD INSTITUTIONS.

6.             Print the single stroke vertical letters in height 28 mm in 7 : 4 ratio, BUY NATIONAL SAVING CERTIFICATES.

           7.Draw freehand sketch &write short notes on the following images in lowercase alphabets.                             

(a) Hexagonal nut


(b) Wing nut


(c) Spur gear


Saturday, 18 December 2021

BEG Week 2 Session1 Dimensioning Exercises


Friday, 17 December 2021

BEG – WEEK 2 SESSION 1 Dimensioning

 BEG – WEEK 2 SESSION 1

STUDY MATERIALS

Syllabus

ü  1. Demonstrate the dimensioning and its necessity, methods, and principles,

ü  2. Sheet no.2  Dimensioning of overall sizes, circles, threaded holes, chamfered surfaces, angles, tapered surfaces, holes, equally spaced on P.C.D., countersunk holes, counterbored holes, cylindrical parts, narrow spaces and gaps, radii, curves, and arches.

https://anchor.fm/s.deivanai/episodes/Dimension-e1c1vcs

Dimensioning

Principles of Dimensioning

The following are the basic principles of dimensioning:

1. All dimensional information necessary to define a part clearly and completely shall be shown directly on a drawing.

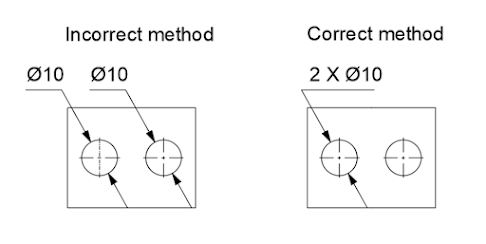
2. Each feature shall be dimensioned once only on a drawing.

3. Dimensions shall be placed on the view or section that shows clearly, the corresponding features

4. As far as possible, on a drawing, dimensions should be expressed in one unit only, preferably in millimeters, without showing the unit symbol (mm). Unit on the drawing, however, may be shown in a note

5. No more dimensions than are necessary to define a part shall be shown on the drawing. No feature of a part shall be defined by more than one dimension in any one direction


https://youtu.be/HNlsbYi_Uvc


சுகந்தி

சுகவாசி சுகபோகி சுதந்திர தேவி!  எனது வலியை அறிந்தவள் வறுமையை பகிர்ந்தவள் செழிப்பில் மகிழ்ந்தவள் அகம் புறம் அனைத்தும் அறிந்தவள் உர...